Search This Blog

Friday, 26 April 2013

Origami bags and tissue paper flowers

What a great day today! My neighbours daughter spent the day shadowing me, and although we didn't get to make any jewellery, because I have been waiting for supplies to arrive, we still managed to be very productive.
 
My very brilliant helper and I have made all of the origami party bags for Daisy's party, and decorated each of them with a lovely tissue paper flower.  We also spent some time experimenting with origami crafts for them to make at the party, including some great butterflies that flutter to the ground when you throw them in the air.
 
 
I'll post some tutorials next week on tissue paper flowers and pom-poms. Watch this space...

Thursday, 25 April 2013

Ink, Bleach, Water and Salt


After the great response I had after posting some of my sketches on facebook I thought I'd spend some time today working on some new ones.  I only had a couple of hours, so I prepared some backgrounds using ink, bleach, salt and water, that I can work into later.  I had great fun!
 
Tomorrow is set to be an exciting day too!  One of my neighbour's daughters is going to be work shadowing me! Watch this space to see what we get up to...

Monday, 22 April 2013

Hand Printed Party Invites


The party invites are printed and ready to be given out to Daisy's friends.  They were really easy to make, and didn't cost a penny because they were made using things I already had in the children's craft drawers (sugar paper, paint, play dough rolling pin), and some polystyrene sheet (takeaway cartons and packaging are ideal).


Next job is to think of some crafts for the children to do, and sort out the party bags.

Friday, 19 April 2013

Simple printing with polystyrene sheet
 
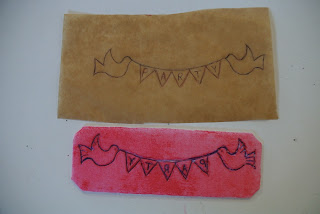
Invites are printed!  I began by drawing my design onto some tracing paper in pencil, which I then flipped over and printed onto the polystyrene sheet.  The text on the polystyrene will be backwards, which means that your printed image will be the correct way round. Next go over the design with a pen or pencil so that the design is impressed into the polystyrene.
 
 
Using a child's rolling pin I rolled the paint onto the polystyrene sheet, placed the painted sheet onto the paper, then rolled over that to transfer the image. I have printed it on to sheets of coloured sugar paper, but in my first attempts the writing wasn't clear enough.
 
 
So I enlarged the design, and tried again.  I'm really pleased with the results.
 
 
Tomorrows job will be to cut them out, and put the party details on the back before handing them out to the guests.
 

Wednesday, 17 April 2013

Having just moved into my fantastic new studio I'm on a handmade mission!  I'm looking forward to trying lots of new crafts, and ,where possible, making things myself.  My first challenge is my daughters' birthday party.  I have a couple of weeks to prepare for it, but my plan is to do a crafting party in my studio for a few of her friends.  First up will be the invites, which I'm going to print myself.


This is my simple design.  I've done some linocut printing before, but I'm going to try this just by inscribing the design into some polystyrene sheet ... you can't get much simpler than that!